kristenjfagan

Tutorial Tuesday: Swarovski Cosmic Triangle Necklace

SwarovskiTriangleNecklace-1

Tutorial Tuesday is a blog series where I share a do-it-yourself jewelry tutorial.

Since I had another one of these beautiful Swarovski cosmic triangle crystals I had to make a matching necklace to this knit bangle tutorial I shared earlier this month. I just love the richness of the champagne color paired with smokey quartz, gold and red wire.

SwarovskiTriangleNecklace-2

Materials

Soft Flex .019 Beading Wire Red Coral – 8″
Swarovski 6mm Round Smoked Topaz – 4
Swarovski 20mm Cosmic Triangle Ring Golden Shadow – 1
Gold Spacer Beads – 2
Gold or Brass Colored Chain – 18″
5mm Brass Jump Rings – 4
12mm Antique Brass Lobster Claw Clasp – 1
2x2mm Gold Filled Crimp Tubes -4
Magical Crimping Pliers
Chain Nose Pliers
Cutters

Instructions

SwarovskiTriangleNecklace-3

1. Cut 54″ length of Soft Flex beading wire in red. Wrap the end of your beading wire around one side of the triangle crystal and back through a crimp tube. Leaving one wire tail long enough to string your beads on, crimp using the magical crimping pliers. Trim excess wire on the shorter tail. Click here for magical crimping instructions.

SwarovskiTriangleNecklace-4

2.  String 1 crystal round, 1 gold spacer, 1 crystal round and 1 crimp tube. Create a loop with your beading wire feeding the end back through the crimp tube. Crimp using the magical crimping pliers. Trim excess wire and push strand to the one corner of the triangle.

3. Repeat steps 1 and 2 on the  other corner of the triangle.

SwarovskiTriangleNecklace-5

4. Using your chain nose pliers, open the jump rings and attach a jump ring to each strand loop and to your chain. At the back of your chain attach 2 more jump rings and your lobster claw clasp. 

SwarovskiTriangleNecklace-6

Tutorial Tuesday: Swarovski Crystal Knit Bangle

SwarovskiTriangleBangle-1

Tutorial Tuesday is a blog series where I share a do-it-yourself jewelry tutorial.

Check out this beautiful Swarovski cosmic triangle crystal! The richness of the champagne color paired with smokey quartz, gold and red wire gives  the design a feeling of bold elegance.

SwarovskiTriangleBangle-2

Materials

Instructions

1. Knit a 5″ length wire cage with Soft Flex beading wire in red and a 5-pin knitting spool. using using Style 1 in the instructions found on Soft Flex company’s website. Click for instructions on how to knit with beading wire. Leave at least a 2″ tail of wire at the beginning and end of your knitted wire cage. 

SwarovskiTriangleBangle-3

2. Once your knitted wire is approximately 5″ in length, remove the knitted wire from the spool. One by one, drop (12) crystal round beads inside the knitted wire cage unstrung. 

3. Weave your wire tail through the knit loops to close it up. I go through the loops a few times to make sure the end is secure. You will now have a closed knit wire cage with a one strand wire tail coming out each end.

SwarovskiTriangleBangle-5

4. On one tail end of your knitted cage, string 1 crystal round, 1 gold spacer, 1 crystal round and 1 2x2mm gold filled crimp tube.

5. Wrap the end of your beading wire around one side of the triangle crystal and back through your crimp tube. Crimp using the magical crimping pliers. Click here for magical crimping instructions.

6. Repeat steps 4&5 on the other side of your knitted cage. Since the finished design will stretch, you do not need to attach a clasp.

SwarovskiTriangleBangle-6

7. Cut 16″ of craft wire in bronze, thread about 2″ of wire through the knitted cage and wrap around a couple of times to secure. Now, take the longer end and continue to wrap around the cage until you have created a cone that covers up the ends of the knitted cage.  Repeat on the opposite side.

SwarovskiTriangleBangle-10


SwarovskiTriangleBangle-11

Isalina Sweet Treats Logo Design

11130255_843389719065220_2629506164824315130_n

My friend Virginia has a passion for baking. She decided to start a baking blog, Isalina Sweet Treats and asked me to design her logo. Virginia is a talented baker and she shares her favorite desert recipes at Isalina Sweet Treats. She has a ton of wonderful free recipes already posted. Don’t they look delicious? I’ve had her cinnamon rolls and they are soooo good! Isalina-SketchesVirginia was looking for a elegant, sweet, but serious design in a light color scheme. She also liked the idea of a swirl of ganache on a plate. She pick a couple of color palettes at ColourLovers website and I created the 3 computer sketches above. Virginia ultimately decided on the middle design. After a few options on the lettering style shown below, the middle design is the winner and her logo is born!
Isalina-Sketches2

Find Virginia’s recipes for delicious deserts at Isalina’s Sweet Treats on Facebook or go straight to her website IsalinaSweetTreats.com.

Brazilian Agate Necklaces

I added a few new wire wrapped agate necklaces for sale in my shop.

AgateCollection-Trio

Brazilian agate takes about 80 million years to form and each slice is an original. Brazilian agate balances the four energies: physical, mental, emotional and spiritual. Worn for protection, centering, healing and strength as well as better concentration, more confidence and an overall feeling of composure. Protects you from stress and energy drains.

Shop Agate Necklaces.

Lively Flower Artwork

Still life flowers transformed into lively flower artwork! I began a three canvas journey with these still life’s below a couple months back. The feeling I got creating the still life’s was one of stiffness, restraint, questioning. I knew I needed to free up my process and start again so, I painted over the paintings. I am so much happier with these flower paintings. I know how much joy I poured into painting them and I think it shows.


3Flowers2

Shop original paintings in my Etsy shop.

3Flowers-products

Shop for prints and printed products in my RedBubble shop.


Handmade Bracelet Bonanza

I have been an a bracelet making kick! I have new designs as well as restocked a few favorites in my shop.

PurpleArtDecoMacrame3

First up are these new art deco + bohemian chic macrame bracelets.

I shared this jewelry tutorial on how to make this design and instantly feel in love with it that I had to make a collection of colors. Beautiful when layered together or with other bracelets. Made with high quality beading wire coated in nylon that will never fade, fray or chip.

Shop Macrame Bracelets.

IMG_8789

Next up are these dainty, delicate modern bar bracelets.

Minimalist elegance on your wrist. Beautiful and simple alone and lots of fun when layered. I made a bunch of these to sell at a local shop and they sold out fast! So naturally, I whipped up a few more. This is the last batch for awhile as I need to replenish my supplies.

Shop Modern Bar Bracelets.

KnittedBracelets

Last but not least I restocked these one-of-a-kind knitted bangle bracelet designs.

I hand knit the bracelet with high quality flexible beading wire and a knitting spool. These bracelets fit like a bangle and are for those of us who like a piece of jewelry that’s bold, one-of-a-kind and makes a statement. Sizes and styles vary.

Shop Knitted Bangle Bracelets.


Coconut Almond Granola

Granola

I love granola and after watching an American Test Kitchen episode where they made a simple almond dried fruit granola, I decided to give it a try. I love that the ATK recipe is easy to change up with different combinations  of nuts, dried fruits and vanilla or almond extract. After trying a few different batches this is my favorite combination.


Coconut Almond Granola

5 cups of old fashioned oats

2 cups of chopped almonds

1/3 cup maple syrup

1/2 cup coconut oil (liquid form)

2 teaspoons almond extract

2 cups raisins

2/3 cups of shredded sweetened coconut

Mix the oats, almonds, maple syrup, coconut oil and almond extract together well.  Place on a parchment lined cookie sheet and using a potato masher use a little muscle to tap the mix down on the cookie sheet. Bake in a 325 degree oven for 30-35 minutes. Cool for 30 minutes. While the oats are cooling, toast 2/3 cups of shredded coconut. Once oats are cooled, add coconut and raisins and store in an airtight container.  I love this as a breakfast cereal with almond milk. It’s also tasty as a yogurt topping.

3 Creative Questions

IMG_8601

I’m answering 3 creative questions today!

1. What have I been working on?

oh, a variety of things!

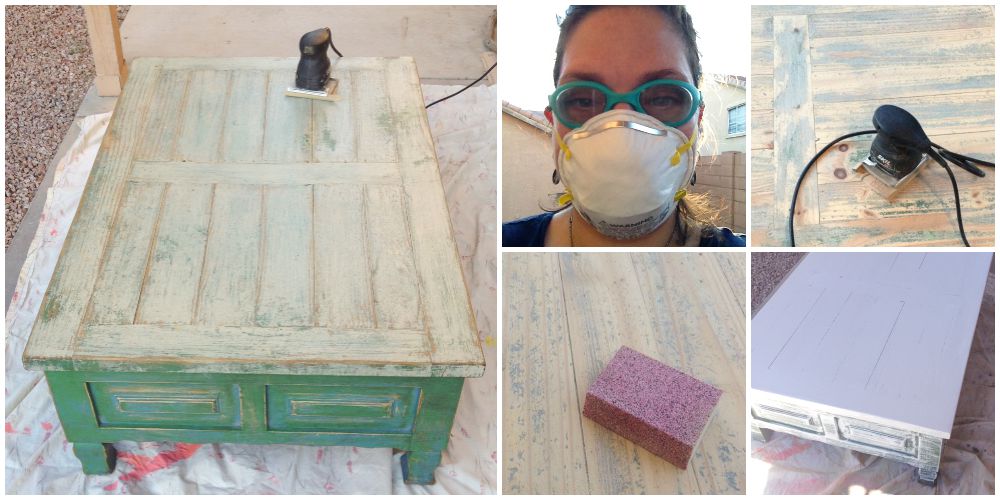
my sketchbook: I have been trying to work in my sketchbook more. I have had the one shown above since 2010 and it’s still not finished. I know that the practice is good for my soul and my art so, I’m challenging myself to work on it more often. After all these years I finally gave the cover a little art love.

wedding invitations: I wrapped up a luscious purple wedding invitation suite that I had been working on with a sweet couple for a few months.

new flower art: The most exhilarating project has been the process of working on three flower still life’s and then completely painting over them in a style that is more reflective of me and my work. It was an amazingly freeing process and one that reminded me to “paint like you“. I plan to photograph them this weekend.

custom kids art: I am in the beginning stages on a few custom art pieces that will hang in the bedrooms of two little boys.

2. Why do I create what I do?

I started years ago with the desire to share the creative things I was doing in my life with the world and to sell my creations. Though I still do that, my goal has changed. My journey to becoming an artist has had numerous starts and stops. My dream is paint and be a self sufficient artist supporting my family from my creative work. I do this to share myself through art, create custom pieces for important moments in one’s life and to bring joy to the lives and sacred spaces of those that collect my art.

3. How does my creative process work?

I begin by choosing a subject I’d like to work with and gathering bits of inspiration. I may make a vision board and collect things that inspire me, I may sketch ideas, I may take pictures but, many times I just start painting and see where it leads. If I’m working on a custom piece I tend to sketch more and draw on the canvas before starting however, if I’m working on my own art, I’m much freer and enjoy letting the art unfold. I usually start with a general idea and layout in mind but, let myself get lost in creation and explore.

Tutorial Tuesday: Art Deco Macrame Bracelet

DecoMacrameBracelet-1

Tutorial Tuesday is a blog series where I share a do-it-yourself jewelry tutorial.

 Although I love the feeling of original Soft Flex beading wire, I decided to give Econoflex hobby beading wire a try for a cheaper option plus, the bright colors of Econoflex wire are so pretty.
Materials
Silver Jump Rings – 2
Instructions

1. Cut two 12″ strands of Econoflex craft beading wire and anchor them into a notch on the top of your mini macrame board.

2. Cut one 50″ strand of Econoflex craft beading wire – this will be your knotting strand.

3.Create 20 knots using the Half Knot Spiral method below.

  • The right wire goes over the two center wires, then under the left wire. 
  • The left wire goes under the two center wires, then comes up through the hole and passes over the right wire. 

4. Pick up one silver cube bead, remove the two center wires anchored at the bottom of your macrame board and string the bead them and up to your last knot.

5. Wrap your knotting wire around the bead and continue your Half Knot Spiral pattern below the bead creating another 20 knots. 

6. Repeat steps 4 and 5 until you reach your desired bracelet length, keeping your clasp size in mind.  

7. Add a 3mm crimp tube and crimp around 1 jump ring using the mighty crimper. Attach one side of the toggle clasp to the jump ring. On the other end of the bracelet, add a 3mm crimp tube and crimp around 1 jump ring using the mighty crimper. Attach the other side of the toggle clasp to the jump ring. Click here for crimping instructions.

Volunteer Art Projects

When artistic opportunities arise at my kids’ schools I try my best to make the time to help. It’s not always easy but, it is always worth it. It’s a way I can be involved while doing something I love to do – win/win!

Here are two art projects that came up this year that I was happy to help with.

MrsSilvaCollage

Hudson’s class worked on a collaborative art project to auction off at the school’s annual fundraiser. I was delighted to help the class with their creation. I brought in few options and the class voted on which idea they liked best. Then, I went into class a few times to assist the kids in painting the background and patterns for the piece. We also decided to include their classroom character traits so, you’ll see words like Honest, Respectful, Appreciative sprinkled throughout. Then I took all the painted sticks home, arranged them and framed them. I really love the end result – the kids did an amazing job!

EthanFieldCollage

Ethan’s school athletic day was centered around the Greek Olympic games and the P.E. instructor had the idea to create shields for the teams. They traced Greek symbols onto the shields and me and few other parents painted them for the event. I also helped out during field day by scoring the shot put event and got to see the opening and closing ceremonies with all the shields displayed! Such a fun day.

Paint Like You

LikeYou

The desire to paint a flower still life has been in the back of my mind for awhile. I had a vision for how I thought it would turn out.  After getting some tulips from my sweet husband it inspired me to get started. I began these 3 paintings below – sunflowers, peonies and tulips. They started with good intentions and vision but fell flat on execution for me. I was getting so frustrated and I think it shows in the tight, unnatural feeling I got from this work so, I let them sit for a few days.


StillLife

I picked up the sunflower painting and added pattern, deeper colors and was feeling better about it.  I slept on it and the next day I realized it just didn’t feel right and I asked myself – would I hang this art proudly in my home? The answer was no. It didn’t feel like me. At that moment, I reminded myself of something that I had read recently … paint like you. I needed to forget about what I wanted it to be, stop comparing my work to other still life art on Pinterest and just paint like me.


So, I got to work covering up the sunflower still life and this happened instead!

SunflowersCollage


I love looking at the collage and seeing that I could have stopped at frame 5 or 6 or 8 and be really happy with it. Stopping before I “go to far” is something I continue to work towards feeling more confident about. Taking many pictures as I work is helping me see when to let go, call it done and remember to just paint like me.


I encourage you to do things your way too! It is truly freeing to give yourself permission to just be you.

Tutorial Tuesday: Soft Flex Kumihimo Bracelet

KumihimoBracelet-1

Tutorial Tuesday is a blog series where I share a do-it-yourself jewelry tutorial.

Materials

Instructions

You will need 10 strands of beading wire, approximately 20″ length for each strand, in assorted colors. If you have 10ft spools of Soft Flex beading wire you may work directly from the spool otherwise, cut your wire strands. I didn’t feel the need to use bobbins with my cut wire strands.

Gather your wires and slide a 3mm crimp tube on one end of your cut wires or the end not attached to your spool if working from the spool. Slide your crimp up the wire strands leaving a 4″ tail and crimp using your mighty crimping pliers. The crimped wire side will go into the middle of your Kumihimo plate. Click here for crimping instructions.

Set your plate up to have 6 beading wire strands across the top and 4 beading wire strands across the bottom.

Watch Anne Dilker’s Square Kumihimo video for instructions on the braiding technique used
Continue braiding with the technique shown in the video above until you have about 2″ of braided wire and at least 4″ of excess wire left. Remove your wire from the Kumihimo plate. If working from the spools you should now cut the wires free from the spools making sure each strand has about 4″.

Gather the wire and slide on a 3mm crimp tube and crimp using the mighty crimping pliers at the base of your finished braid. Click here for crimping instructions.

Choose one wire strand on each side of your braid to be your stringing wire to complete your bracelet. Trim all other wire strands as close to the crimp tube as possible as shown below.

On one side of your braided centerpiece, string 1 fire polish bead, 1 seed bead, 1 fire polish bead, 1 seed bead and continue to repeat until you have 8 fire polish beads and 8 seed beads. You may need to adjust the number of beads used based on the final design size needed.

Add a 2mm crimp tube and crimp around 1 jump ring using the magical crimper. Attach one side of the toggle clasp to the jump ring. Click here for magical crimping instructions.

Repeat you bead stringing on the other side of the braided centerpiece, 1 fire polish bead, 1 seed bead, 1 fire polish bead, 1 seed bead and continue to repeat until you have 8 fire polish beads and 8 seed beads. You may need to adjust the number of beads used based on the final design size needed.

Add a 2mm crimp tube and crimp around 1 jump ring using the magical crimper. Attach the other side of the toggle clasp to the jump ring. Click here for magical crimping instructions.

Lastly, create a bead dangle using your headpin and 1 fire polish blue bead and attach it to the jump ring connected to your toggle bar. Click here for instructions on how to make a bead dangle.

Note: My design had one strand side longer then the other so, my design turned out slightly asymmetrical with on side having 5 fire polish beads and the other 11 fire polish beads.

Below is another variation you may want to try. This bracelet uses the same braiding pattern on the entire bracelet and introduces beads in the middle.

I followed the kumihimo braid that is shown in the video and when about half the bracelet was braided I strung beads onto the two wires that were held on the sides of the kumihimo board and then continued the braid. Again, I strung beads on the next two wires that were on the side of the kumihimo board and then continued to braid. I repeated that process until I was happy with the center and then continued to braid the second half of the bracelet without adding any beads. Because I used cut wire, I was able to slide a bead on whenever the wires where on the side before braiding them back in.